Getting started on RemotiveBox
RemotiveBox is a popular way for users to start using RemotiveBroker on physical devices. You can request one or build your own.
The box comes preinstalled with RemotiveBroker and the RemotiveBroker App, making it ready to use.
Turning it on
As a first step, turn it on by simply plugging in a USB-C cable. Wait a minute or so for it to boot up. A light through the box cover indicates if the box is turned on.
When you wish to turn off the box, simply unplug the USB-C cable.
Provisioning
When the box turns on, a built-in Wi-Fi hotspot becomes available for you to connect to. Connect to the Wi-Fi hotspot with name remotivelabs-provision and use the password remotivelabs.
After connecting to the hotspot, access the device at http://192.168.4.1:8080 to configure your RemotiveBox by following the on-screen instructions that looks like this:
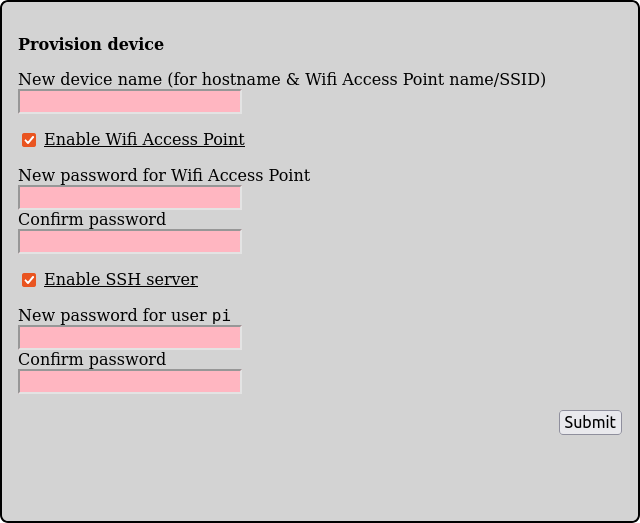
what's configured during provisioning:
- device name, used as host name & Wi-Fi Access Point name
- whether Wi-Fi Access Point should be enabled, and if so its Password
- password for user 'pi'
- whether the SSH server should be enabled or not
The provisioning must be completed within 20 minutes. After that the device must be restarted (power-cycled) before trying to provision again.
The password of user 'pi' during provisioning is: Aut0m0tive
This can be used for access using external screen & keyboard (the SSH server isn't available during provisioning).
Provisioning is required before the device is ready to be used.
Connecting to RemotiveBox from your computer
There are multiple ways to connect to the box.
Using the built-in Wi-Fi hotspot
If you configured a Wi-Fi hotspot in the provisioning step, then this can be used to connect your computer to the box. Connect to the network that has the Wi-Fi Access Point name which you configured and use the password that you chose.
The advantage of using a Wi-Fi hotspot is that you only need the box and your computer, making it suitable for situations like when you are in a garage or on the go with your vehicle.
Please note that with this method, since you are connected to the device via Wi-Fi, your computer also doesn't have access to the internet. Additionally, the box doesn't have internet access either, which prevents you from performing upgrades of the broker and the App and requires extra steps with license management.
Using a LAN cable connected to your office network
Plug in a LAN cable to your device and your office network. The box becomes accessible on your local network with a randomly assigned IP.
The simplest way to find the IP address of the box is to use the command remotive broker discover.
Then open the app URL (e.g., http://192.168.200.220:8080) in a web browser or connect to a gRPC API (e.g., http://192.168.200.220:50051).
The advantage of this method is that the box has access to the internet, which allows you to perform upgrades and easier license management. A LAN connection is also more stable than Wi-Fi.
Using a LAN cable connected to your computer (DHCP client)
Plug in a LAN cable to your device and your computer (with an optional LAN to USB adapter, also known as ethernet dongle).
Then enable internet sharing on your computer. The setting is OS-specific, so please look up a guide on how to enable internet sharing on your operating system.
The box becomes accessible from your computer with a randomly assigned IP.
The simplest way to find the IP address of the box is to use the command remotive broker discover.
The advantage of this method is that you can use it on the go or in your office. You can connect your computer to your phone hotspot, then share that internet connection with the box. You can perform upgrades and simplified license management. The ethernet port of the device is configured to act as a DHCP client.
Using a LAN cable connected to your computer (DHCP server)
Plug in an ethernet dongle to one of the USB connectors on the device. The device configures this second ethernet connector with a DHCP server. You can now connect your computer using ethernet cable to this dongle on the device, and simply navigate to http://192.168.12.11:8080